Lightning protection systems
command  contains
products for designing a complete system of lightning protection installations
for a building, including masts and spires, cables, connectors, housings and
boxes, grounding rods, additional accessories and others. Objects available in
the program can be edited, customized to your own needs and copied to the *User* element category Creating and expanding user type series.
contains
products for designing a complete system of lightning protection installations
for a building, including masts and spires, cables, connectors, housings and
boxes, grounding rods, additional accessories and others. Objects available in
the program can be edited, customized to your own needs and copied to the *User* element category Creating and expanding user type series.
This command also includes access to lighting protection
system solutions from AH- Hardt, Budniok Technika, Elko-Bis, El-Sun, Gromtor and
Pawbol.

Lightning Protection Systems dialog box.
Lightning Protection Systems
dialog box
contains:
The top tools menu that contain the following active
buttons:
 Define new - ads a new
element to the database. The method of extending the database is described in
the Defining User Blocks chapter.
Define new - ads a new
element to the database. The method of extending the database is described in
the Defining User Blocks chapter.
 Technical data - information about the parameters of the
selected object.
Technical data - information about the parameters of the
selected object.
 Translate command - opens a glossary of terms used in the command
dialog and allows user to add his own translations.
Translate command - opens a glossary of terms used in the command
dialog and allows user to add his own translations.
 Help - contains a link to the online support file.
 Video - contains a link to an instructional video on CADprofi
website.
Video - contains a link to an instructional video on CADprofi
website.
 Copy to "User" category - allows user to copy and edit the item
type.
Copy to "User" category - allows user to copy and edit the item
type.
 Edit - allows user to edit an item from the "User" directory.
 Delete - allows user to delete an item from the "User"
directory.
Delete - allows user to delete an item from the "User"
directory.
In addition to the above functions, this command also
includes options for searching the entire database of lightning protection
system elements or in a selected branch.
Context menu - contains options available for the
selected item after clicking the right mouse button. Commands from the context
menu are analogous to commands from the toolbar.
The command dialog box contains the following fields:
Category Tree - a collection of all categories and
items contained in the library, presented in an expandable tree layout. User can
adjust the order in which items are displayed in the list by using the Sort
option.
Detailed list -
contains a detailed list of available items.
Thumbnail view - displays the contents of the
currently selected category as thumbnails.
Preview - a window that displays a large preview
of the selected item. Right-clicking on the preview will enlarge the view.
View and insertion
point - contains view options and editing of object dimensions.
Allows user to enter additional information
about the object.
Dimensioning -
enables precise determination of mast protection zones using the cone method
(protective angle) for a single mast, as well as the rolling ball method for a
single mast and multiple masts in four LPS protection classes. At each stage of
the project, program enables the introduction of corrections to the masts
arranged, automatically recalculating the designated protection zones according
to the given parameters (heights of protected devices and LPS class).
Protection Class
- allows user to select an option from the drop-down list.
Accessories -
allows user to select an item from the drop-down list, as well as add his own
items.
Next to the OK button
there is a radio button in the form of a drop-down list that contain
the available insertion options:
Arrange - allows for
precise arrangement of selected elements in the drawing. We can arrange
installation elements
in a selected envelope, in a rectangular array, along
a section, along a line or "infoline" and dynamically. Each of the arrangement
methods also allows for determining the method and type of arrangement Working with symbols - general rules.
 Settings - allows user to specify dimensioning parameters using the
rolled ball method for multiple masts.
Settings - allows user to specify dimensioning parameters using the
rolled ball method for multiple masts.
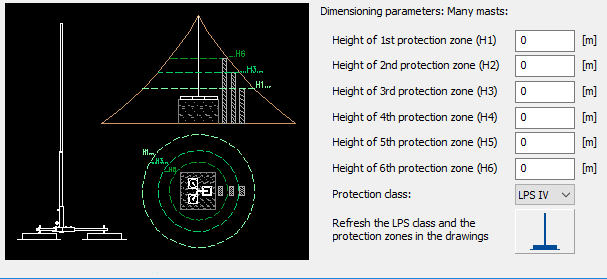
Settings dialog
box.
Dynamically define the protection zone for masts
Program allows user to design lightning protection systems in
four LPS protection classes and precisely determine mast protection zones using
the cone method (protective angle) masts, as well as the rolling ball method for
one mast and dynamically for multiple masts. Program allows user to determine
and visualize the protection zone at given heights and a specific LPS class for
selected masts using the rolling ball method. Determining several 'isolines' for
different heights of the protection zone. Determining the upper penetration for
masts inserted in the side view. It also takes into account different mast
heights and their installation heights. Automatic updating of the protection
zone when moving, deleting or copying masts. Automatic calculation of the
optimal distance between masts for the Arrange
function. Determining the protection zone with dedicated layer types that
contain information about their heights.

Dynamic determination of lightning protection areas is
available in the latest versions of:
•
AutoCAD, AutoCAD Architecture, AutoCAD Mechanical 2010
-2026
•
BricsCAD 2014-2026 in version Professional / Ultimate / BIM /
Mechanical
•
GstarCAD, GstarCAD Architecture, GstarCAD Mechanical 2014-2026 in
version Standard / Professional / Plus
•
ZWCAD, ZWCADArchitecture, ZWCAD Mechanical in version
Professional
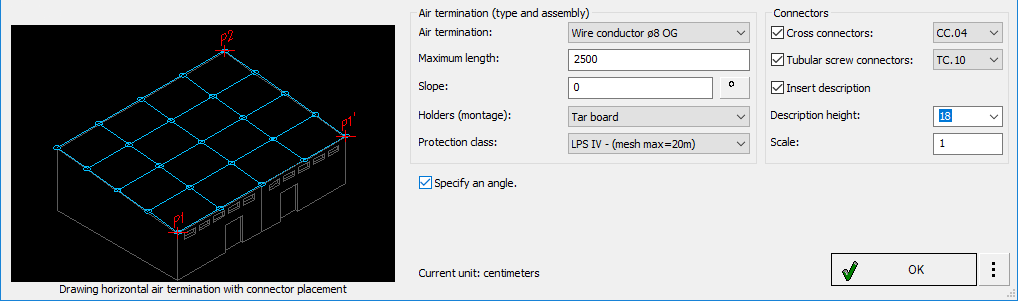
Automatic drawing of horizontal air terminals with connector
distribution
This function enables dynamic drawing of horizontal air
terminals for roof slopes made of different materials and inclined at various
angles, which ensures precise alignment of the design with the actual roof
geometry. Program allows the design of installations for mono-pitch and gable
roofs, including automatic connector placement. User can select conductors,
define their maximum length, specify the roof slope inclination angle, choose
the installation method depending on the type of roof covering, and define the
LPS protection class. Additionally, this function allows the selection of cross
connectors and straight-through connectors.
 Automatic drawing of
horizontal air terminals with connector
distribution
Automatic drawing of
horizontal air terminals with connector
distribution
6
Procedures
Inserting lightning protection
system elements
1.
Run the Lightning Protection Systems command
.
2. In the dialog box, select a
category from the available list.
3.
Select an item from the list that you want to insert into your drawing.
A preview of the selected object will be displayed in the
lower part of the window.
4.
(Optional) Specify additional options for the selected item by entering data on
the right side of the command dialog box: View and
insertion point.
5.
Press the OK button. (Optional)
Specify the arrangement method.
6.
Select the object's insertion point in the drawing.