The numbering system allows to assign numbers to symbols and objects that were created with CADprofi program. Objects data as well as their numbers is used to create descriptions and specifications. The Numbering command can work in two modes. If user runs the command and selects an object or symbol, that hasn't been previously numbered, then the program will allow to number objects. On the other hand if user indicates an object that already has a number, then the command will work in a delete numbers mode.
Program uses separate numbers strings used for various installations, industries and objects types. This means that when user numbers objects, for example from the electrical module, then the program will start the numbering from the number 1. If user starts the numbering process with a different module, then the program will start again from the number 1. To distinguish different numbering strings it is recommended to add prefixes or suffixes to them, so they will look different (e.g. E-1, E-2 for the exhaust system and S-1, S-2 for the air supply).
CADprofi uses the following strings:
•Numbering of 2D lines and fittings for both piping and ventilation installations - separate numbering for the following installations: supply, return, sewage, exhaust, supply air.
•Numbering of 2D electrical trays - separate numbering for different systems.
•Numbering of symbols, objects - common numbering is used for all elements from a particular module.
|
Notice The Numbering command is used to add order numbers to individual elements of the project. CADprofi program also have
another methods of numbering: |
Assigning numbers
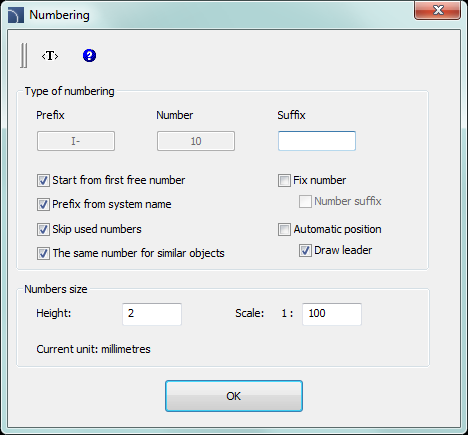
In the dialog window user should specify the numbering mode as well as size and appearance of numbers that will be inserted. The number can consist of three parts:
•Correct number must have an integer value from 0 to 32767.
•Prefix - any kind of text. Prefix is often used as an indication of an installation or system, e.g. number "A4-12.1" has got a "A4" prefix which means it's a fourth air supply system. The Prefix from system name option is used for automatic addition of prefixes.
•Suffix – any kind of text. In case of using a multi-level
numbering it is possible to automatically add suffixes to them. In order to
enable this method user should turn on both Fix
number and Number suffix options. After that
CADprofi will start numbering only the last of the number.
Examples
of a multi-level numbering (only the last part is being numbered):
|
A4–7–1 |
A4–7–2 |
A4–7–3 |
|
A4–7–1.2.1 |
A4–7–1.2.2 |
A4–7–1.2.3 |
|
7–1.2.1 |
7–1.2.2 |
7–1.2.3 |

Numbering dialog window
The dialog window contains the following items:
Prefix – box that allows to add a numbering prefix.
Number – box that allows to specify the object number.
Suffix – box that allows to add a numbering suffix.
Start from first free number – automatically assigns the lowest possible number in a given chain. Disabling this option allows to manually set the value.
Prefix from system name – automatic completion of prefixes.
Skip used numbers – disabling this option will allow to repeat numbers.
The same number for similar objects– automatically gives the same number for two identical bends.
Fix number – enables usage of a fixed number for all numbered objects. Enabling this option allows to use suffix numbering.
Number suffix – numbering by adding numbers to the suffix.
Automatic position – automatic placement of a numbering block in a point indicated during the object selection. Enabling this option gives the possibility to specify the placement of the numbering block for each indicated object.
Draw leader – draws a leader between the indicated object and the numbering block.
Numbers size – option that gives the possibility to specify the numbers size on the printing:
•Height – specifies the block text height in millimeters.
•Scale – allows to specify the scale in which the drawing will be printed.
Numbering
After user runs the Numbering command he should indicate an object. If this object doesn't have a number, then a dialog window will appear, in which it will be possible to specify the numbering options. In order to start the numbering process press the OK button and depending on settings indicate the numbering placement for the previously indicated object. The command will remain in the numbering mode, allowing user to number additional objects. Within a single numbering command, only objects from the same branch/industry can be numbered. It means that if user starts numbering for example an air supply installation then till he ends the command he will able only to number lines, fittings and objects from the air supply installations. If user wants to number other installations he has to run the command again. In the case of indicating an object, that does not belong to the same branch/industry or if a selected object already has a number then this object won't be numbered e.g.> Object is not compatible with previously selected object or > This object has already got a number: 1.
Procedures
1.
Run the Numbering  command.
2. Indicate the first object that you would like to number, this object will serve as a source object for a given numbering string. The Numbering dialog window will appear.
3. (Optional) Specify the numbering options.
4. (Optional) Specify the numbers size on the printing by setting both Height and Scale for numbering block texts.
5. Click the OK button to close the window and start the numbering process.
6. (Optional) If the Automatic position option has been turned off then specify the position for the first object number.
7. (Optional) Indicate additional object that you would like to number. If it’s necessary you can also indicate numbering blocks.
8. You can end the command by clicking the Esc or Enter keys.

Example of different numbering strings in a single drawing
Deleting numbers
During the numbering process to the objects, the numbers are assigned both as a visible text and as an invisible data. Deleting text with the number won't delete number from the object. For this reason, in order to delete numbers, user should use the Numbering command.
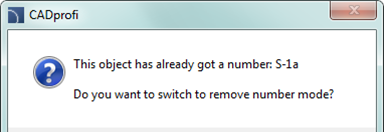
If user selects after he runs the command, a block that
contain information about numbering then a window will appear, that allows to
enable the remove numbers mode.

After user activates the remove numbers mode, he should to select desired objects or numbers. Internal information as well as number texts and leaders will be removed.
Procedures
1.
Run the Numbering  command.
2. Select an object that contains numbers (P1). A dialog window will open.
3. Choose Yes, to start the process of removing numbers.
4. The number of the first selected object will be deleted.
5. (Optional) Indicate additional objects (P2–P3), from which you would like to remove numbers.
6. End the remove numbers command by clicking the Esc or Enter key.

Notice
Numbering is being removed from
objects when user:
1. Inserts equipment in 2D lines or ducts.
2. Connects
some certain lines or ducts.
3. Runs the “2D Divide pipes/ducts
command”.
4. Removes the symbols by using the "Delete symbols"
command.
Copying objects with numbers
After copying, user should remove invalid numbers and renumber the copied objects again. In order to delete these numbers user can use the remove numbers mode from the Numbering command. After user runs the command he should indicate the invalid text (P1), and then with the help of the selection window delete texts (P3–P4). Other objects may be present in the selection window, as the command will only remove numbers.
Notice
Very important: When user copies numbered objects the source elements are treated as objects without numbers!!!
 |
Removing invalid numbers and renumbering of copied objects