command allows to draw
2D views and schemes of sewerage installations. User has the possibility to
insert single objects and to draw whole sequences of pipes with automatic
insertion of appropriate elbows.
command allows to draw
2D views and schemes of sewerage installations. User has the possibility to
insert single objects and to draw whole sequences of pipes with automatic
insertion of appropriate elbows.The Sewage
systems command allows to draw
2D views and schemes of sewerage installations. User has the possibility to
insert single objects and to draw whole sequences of pipes with automatic
insertion of appropriate elbows.
It is also possible to use manufacturers' libraries (e.g. Wavin where PVC, AS and welded HD-PE elements are available) that are available in the Products library command.
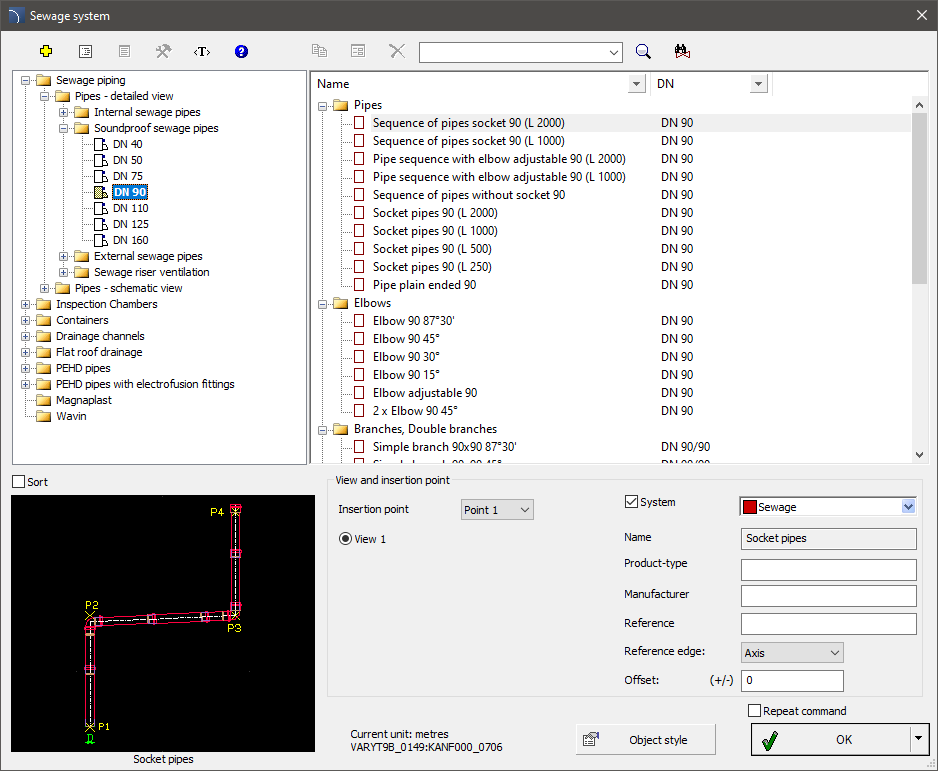
Sewage system dialog window
Graphical layout and the base dialog window functions used for drawing pipe systems are the same as in the Parametrical armature dialog window.
In the Sewage system command internal sewage, external sewage and soundproof sewage systems are available. All elements have got properties that allow to automatically attach inserted elements to other elements. At the same time program checks if the connection is appropriate and optionally reports problems or mismatched parts.
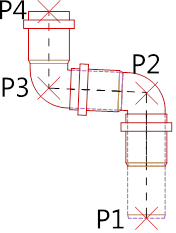
After selecting the Sequence of pipes it is possible to draw installation along the indicated consecutive points with automatic insertion of elbows.
 Drawing line
sequences
Drawing line
sequences
|
The selection of elbows is done automatically in such a way to best match the shape of the designed installation to the intention of the user. After indicating by the user the consecutive points, the application chooses from the database an elbow with the closest possible angle. If necessary, the lengths of drawn pipes sections are corrected. |
|
6 Procedures
1.
Run the Sewage system command or Products
library and afterwards open the Wavin
library.
2. In the dialog window select the appropriate category and fitting size (diameter).
3. (Optional) If a list has got subcategories, double click on a particular subcategory in order to expand it and view its contents.
4. (Optional) Change the View for the selected fitting.
5. (Optional) Change the settings for the Object style.
6. (Optional) Enable the System option and select the installation type.
7. Click the OK button in order to insert the selected fitting in the drawing.
8.
(Optional) Click the  button and
select Insert (specify all dimensions), in order to
specify the dimensions of inserted object.
button and
select Insert (specify all dimensions), in order to
specify the dimensions of inserted object.
9.
(Optional) Click the button and
select Insert (specify style for object), in order
to make changes in the Object style before
inserting an object.
10. Click on the edge of the line or fitting in order to attach the selected fitting.
11. (Optional) Click at any point in the drawing in order to insert an element.
12. Specify the rotation angle and the insertion direction.
1.
Run the Sewage system command or Products
library and afterwards open the Wavin
library.
2. In the dialog window select the Sequence of pipes position.
3. (Optional) Indicate the appropriate base point.
4. Click the OK button in order to start drawing by indicating the consecutive points.